How to Use the Trim Tool in Windows Live Movie Maker
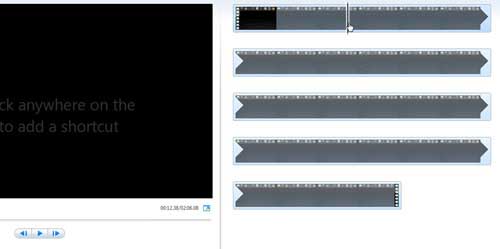
Learning to cut a clip in Windows Live Movie Maker is going to involve the Trim tool. This specific utility allows you to select a point in your video where you want the clip to begin, trim the part before it away, then select where you want the clip to end, and trim the part after it away. This results in a video file that consists entirely of the clip that you want to send to your friends, family or colleagues, and does not include any of the extraneous video that you do not want or need them to see. Launch Windows Live Movie Maker by clicking the Start button, clicking All Programs, then clicking the Windows Live Movie Maker option. Click the Add videos and photos button in the ribbon at the top of the window, then double-click the video file that contains the clip you want to cut. Click the Play button under the preview panel at the left side of the window, the click the Pause button when you are at the desired start point of your clip. You can also click on the video’s timeline at the right side of the window to manually scroll to the desired starting point for the clip.
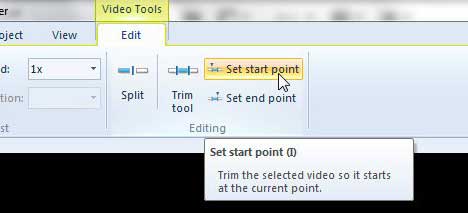
Click the Edit tab at the top of the window, then click the Set start point button in the Editing section of the ribbon.
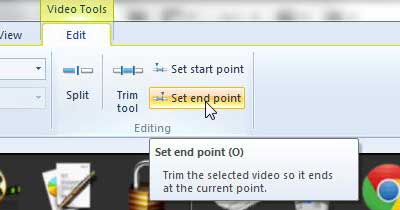
This will remove all of the video that preceded the starting point that you just selected. Click the Play button under the preview panel to begin playing the video again from the start point you just set, then click the Pause button when you have reached your desired end point. You can also manually navigate to the desired end point of the clip you want to cut in the timeline at the right side of the window. Click the Set end point button in the ribbon at the top of the window, which will remove all of the video after that point. The entire video should now consist only of the clip that you have selected.
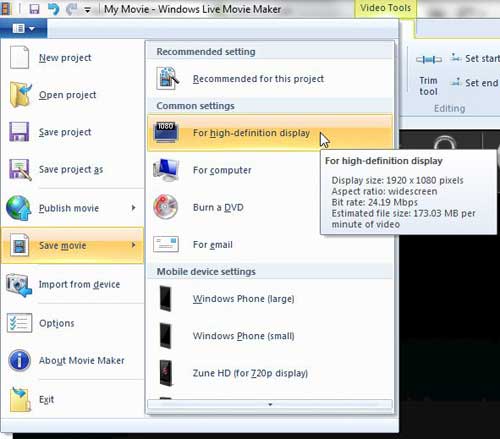
It is very important at this point that you save the clip with a new file name, or you run the risk of accidentally overwriting the complete video file that you started with. Click the Movie Maker tab at the top left-corner of the window, click Save movie, then choose your desired video output size.
Type a new name for the video file into the File name field at the bottom of the window, then click the Save button. After receiving his Bachelor’s and Master’s degrees in Computer Science he spent several years working in IT management for small businesses. However, he now works full time writing content online and creating websites. His main writing topics include iPhones, Microsoft Office, Google Apps, Android, and Photoshop, but he has also written about many other tech topics as well. Read his full bio here.
You may opt out at any time. Read our Privacy Policy