See also
How to insert a check mark in Microsoft WordHow to do small caps in Microsoft WordHow to center text in Microsoft WordHow to merge cells in Microsoft Word tablesHow to insert a square root symbol in Microsoft Word
How to Insert a Row in a Table in Word 2010
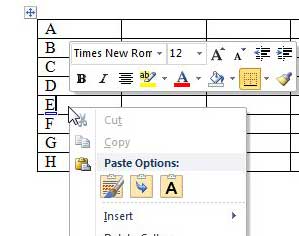
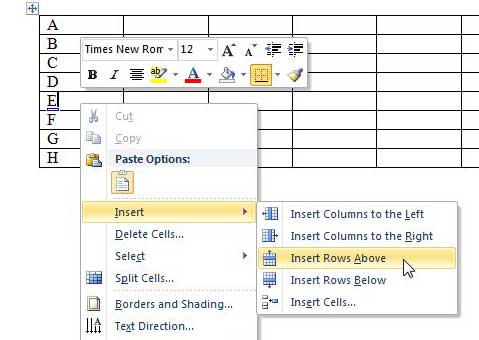
There is actually more than one way to perform this task, but we are going to focus on the option that uses the right-click menu, as that is the fastest option. But if you do not like to right-click, then you can use the Insert Above or Insert Below buttons found on the Table Tools – Layout tab at the top of the window. But continue reading below to learn the answer to the question “how do I add a row to a table in Word 2010?” Step 1: Open the Word document containing the table to which you want to add a row. Step 2: Right-click the row in the table where you want to insert a row either below or above. You can click either an empty cell in the row, or you can click on data in your target row. Step 3: Click the Insert option, then click the Insert Rows Above or Insert Rows Below option, depending upon which choice you want. If you want to delete a row that you have just inserted, you can right-click that row, click Select, then Row. Then you can right-click the selected row and choose the Delete Rows option. To learn more about Word 2010 tables, read this article about hiding table gridlines in Word 2010 tables. You can drastically customize the appearance of tables that you create in Word 201, which is very helpful if you do not like how they look by default in your document. After receiving his Bachelor’s and Master’s degrees in Computer Science he spent several years working in IT management for small businesses. However, he now works full time writing content online and creating websites. His main writing topics include iPhones, Microsoft Office, Google Apps, Android, and Photoshop, but he has also written about many other tech topics as well. Read his full bio here.
You may opt out at any time. Read our Privacy Policy


