But it’s pretty common to misjudge the number of rows or columns you will need in your table, which will mean that you need to know how to add a row to a table in Google Docs. Luckily there are a handful of table editing tools in Google Docs, including one that lets you perform this action. Our Google Docs insert text box article can show you how to include a text box in your document if that is something else that you would like to do.
How to Insert Another Row in a Google Docs Table
When you initially create a table in a document, you may have an idea of what that table’s data will entail. Unfortunately you may discover than you need to add more data, or that you would like to include a header row that you had forgotten about. Perhaps you even need to make your document wider and add some more columns. If you’re using Microsoft Excel and need to be able to filter your data, then the steps in our create table in Excel guide can help you out. While certain settings in your document will be easier to fix than some, such as when you need to change Google Docs line spacing, other options can be a little difficult to find. Fortunately, you don’t need to delete the existing table and re-create it, as Google Docs provides some tools that allow you to modify a table’s layout. Our tutorial below will show you how to add a row either above or below an existing row in Google Docs. Our guide on how to share in Google Docs, Slides, or Sheets can help you if you have been trying to let others view or edit your files.
How to Insert an Additional Row in a Google Docs Table (Old method)
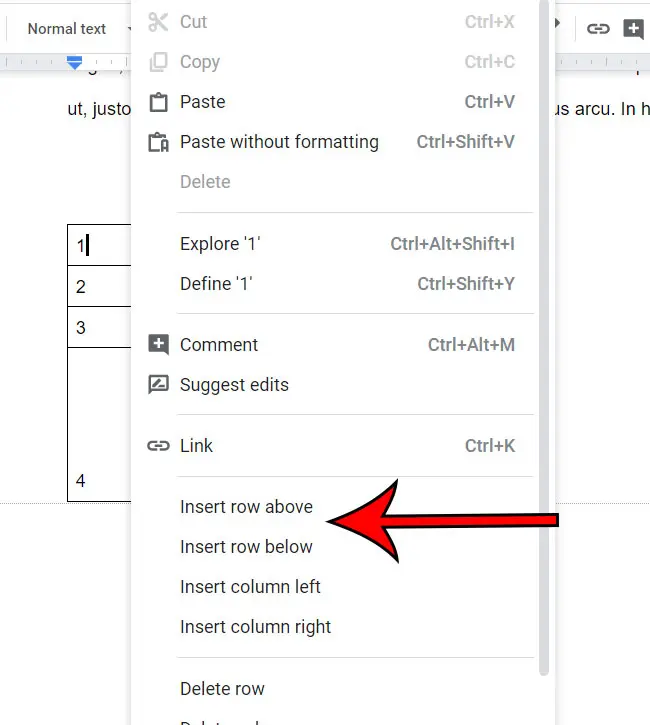
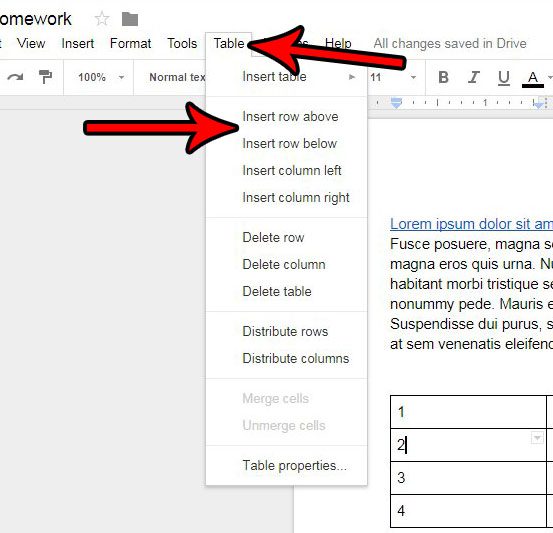
The steps in this section were for an older version of Google Docs. These steps for adding rows no longer apply. The steps in this article assume that you already have a table in your Google Docs document, and that you wish to include an additional row in that table. If you don’t already have a table, you can see how to insert a table in Google Docs, which you can then add an additional row to by following the steps below. Step 1: Sign into Google Drive and open the document containing the table to which you want to add an additional row. Step 2: Click inside the table so that it is active. If there is already data in the table and you want to add the row to a specific location in the table, then click in a row that is either above or below the location where you want the new row. Step 3: Select the Table tab at the top of the window, then click the Insert row above or the Insert row below option, based on whichever option you need. Our tutorial continues below with more information on how to add a row to a table in Google Docs. If you often include data in your documents, then you may also be interested in our guide on how to do subscript in Google Docs. Our guide continues below with additional discussion about how to add a row in Google Docs. Note that when you select Delete row or Delete column, it will delete whichever range your mouse cursor is currently in. You can read our how to delete a table in Google Docs guide for more information.
More Information About How to Add Another Row to a Table in Google Docs
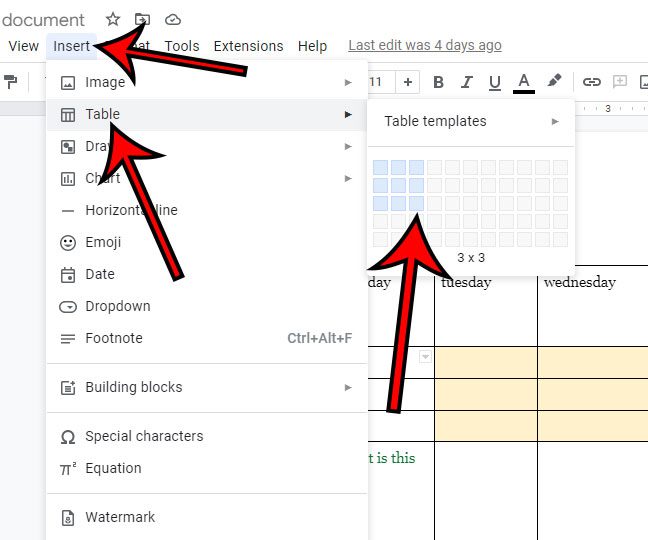
While the steps in this guide have focused mainly on how to include a table row in an existing table, you might also need to know how to add an entire table. You can do this by clicking the Insert tab at the top of the window, then selecting the Table option from the dropdown menu, and choosing the number of rows and columns that you want to include in that table. I am making a table with three rows and three columns in the picture below. You will notice when you right-click on your table that there is a Table properties option as well. If you select Table properties you will have some additional options for editing your table, including:
Cell vertical alignment – You will find this on the Alignment tab Cell background color – This is found on the Color tab Column width – You will find this on the Column tab Minimum row height – This is on the Row tab
There are also a few other options that you can use to edit tables on this menu, which you can find by expanding the sections in the Table properties column. Is there formatting in part of your document that you would like to remove? Find out how to clear formatting in Google Docs and remove all of the different format settings at once, rather than removing each of them individually.
See also
How to change to landscape orientation in Google Docs How to insert a horizontal line in Google Docs How to add strikethrough in Google Docs
After receiving his Bachelor’s and Master’s degrees in Computer Science he spent several years working in IT management for small businesses. However, he now works full time writing content online and creating websites. His main writing topics include iPhones, Microsoft Office, Google Apps, Android, and Photoshop, but he has also written about many other tech topics as well. Read his full bio here.
You may opt out at any time. Read our Privacy Policy


